
Excel VBA Training &
Certification
Lesson 1:
Introduction to the Visual Basic Editor
Written by:
Presented by:
VBA Express
Introduction
To most
people Excel is nothing more than a glorified calculator, or a white board for
setting up text and images. Some people view Excel as a simple word processor
with built-in tables. Sadly, most Excel users will never know, let alone
understand, the program’s full potential.
Delve deeper into the features of Excel and see
the complex calculations that can be performed, or the variety of charts that
can be created to display virtually any amount of data. But even with all these
features, it may seem that Excel cannot do everything that is desired. Users may
perceive these obstacles as real and simply move on, never knowing that Excel
has even more tools available that allow us to manipulate and automate the
program itself in many ways. Those tools come in the form of an interface to
the programming environment, and allow us to run our own code to have Excel
perform unimaginable tasks.
Don’t let the idea of having to write your own
code put you off. Here at VBA Express we write the code and all you have to do
is add it to your workbook. This particular lesson demonstrates how to navigate
through the programming environment, and use code, without ever having to write
a single line of it. Though I would imagine that once you have the knowledge
necessary to start writing your own code, you won’t want to stop.
This lesson assumes that you are familiar with
most of the features of Excel, but you don’t need to be an Excel guru to
understand it.
In this lesson we introduce the programming
environment of Excel. We discuss the programming language, Visual Basic for
Applications (VBA). We discuss the Visual Basic Editor (VBE) and learn where
the code actually needs to be placed. We discuss the settings and functions
that govern the VBE. And we see how to create our own modules and how to set
them up to meet our needs before we start writing any code.
Throughout this lesson there are images of
icons or screen shots that show exactly what we are working with. If possible,
open Excel on your computer and use it throughout the lesson.
Lesson Objectives
- Learn the difference between the Excel
environment and the Visual Basic for Applications environment.
- Learn the definition of some key terms
used in the VBA environment.
- Learn the components of the Visual Basic
Editor window.
- Learn the components of the Visual Basic
Editor Toolbar.
- Learn the options available for
customization in the Visual Basic Environment.
- Learn the components of the Project
Explorer window, and how to navigate it.
- Learn the components of the Properties
window and how to navigate it.
- Learn how to use a very simple macro.
The Excel Environment
Before we begin to look at code, let’s briefly review some of the
elements that comprise the non-programming environment. You put your content of
text and pictures in a workbook and you make it look pretty by using a host of
options: text formatting, page headers,
cell borders, etc. In order to facilitate the application of regularly used
options, they can be bundled up and saved as a Template, on which future
workbooks can be based.
It is not the subject of this lesson, but it is worth getting to know
the relationship between Workbooks and Templates.
Add-ins
When Excel opens, it also opens any installed Add-Ins, which are special
programs that extend the built-in features of the program in some way. There
are thus sometimes two, and quite possibly more, objects open within the Excel
environment. Not all these objects have a visible presence in the standard
Excel interface, but they are all at least partially exposed in the programming
environment.
The Programming Environment
As always seems to be the case, there is a mass of inconsistent and
confusing jargon. For this lesson, only a few terms need defining:
Visual Basic for Applications (VBA): The programming language used to
write programs in Excel and other applications.
Visual Basic Editor (VBE): The environment (or window) in
which VBA code is written.
Procedures: Entities that perform a task and in which the
code is written. Think of them as containers for code, if you will.
Modules: A Container for procedures. A module can hold
many procedures or just one.
Projects: A Container for Modules. All of the VBA code
in any workbook is called a Project.
Sometimes, it is important which type of Procedure or Module is used;
sometimes it isn’t. It is not the purpose of this lesson to go into detail
about these, but future lessons will.
The Visual Basic Editor
Enough background information! Let’s look at
the VBE (the programming environment) to see what’s there, and find out how to
work with it. Open Excel, then press ToolsàMacroàVisual Basic Editor from the Menu; or
use the keyboard shortcut: Alt+F11. The
VBE opens up in a new window, which is shown in Figure 1.
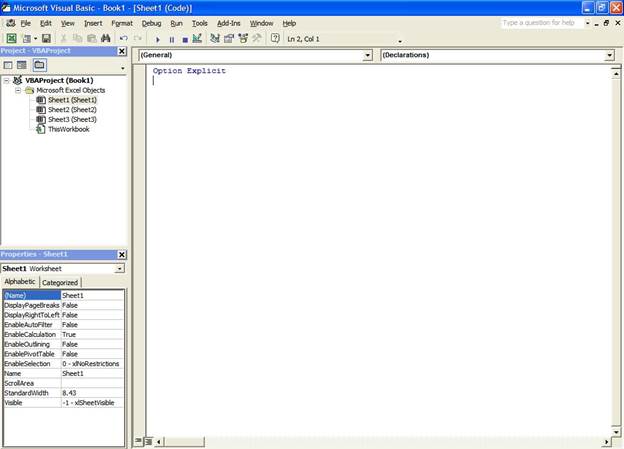
Figure 1: The
Visual Basic Editor Window
The VBE window is just like any other window. It has a Title Bar, a Menu
Bar and a Tool Bar, all with some very familiar contents, although possibly
also containing some options or icons you’ve not seen before. The main body of
the VBE window consists of one or more sub-windows.
The VBE Toolbar
Figure 2 depicts the VBE Menu Bar and Standard toolbars,
collectively called the Visual Basic Editor toolbar in this training course.
From it various tasks can be performed when using or writing code.

Figure
2: The VBE Toolbar
Some of the buttons available on the VBE
toolbar are as follows in the table below.
|
Icon |
Description |
|
|
View Microsoft Excel – Switch focus from the VBE back to Excel. |
|
|
Insert – Select the drop down arrow and you are
provided with choices to insert a new UserForm, Module, Class Module, or
Procedure. |
|
|
Run – Press this button to make your code start
to run. |
|
|
Break – Press this button to put your code in
“Break” mode and stop it from running. |
|
|
Reset – If your code is in “Break” mode, press
this button to reset your code to its normal status. |
|
|
Design Mode – Press this button to temporarily disable
any code from running while you are working on your workbook, such as while
editing a command button. |
|
|
Project Explorer – Displays the Project Explorer window. |
|
|
Properties Window – Displays the Properties Window. |
VBE Options
The VBE has its own set of options that allow
for customizing the interface to your own preferences. From the VBE Toolbar select
ToolsàOptions, to display the Option dialog shown in Figure 3.

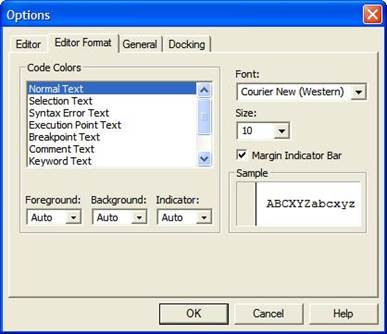
Figure 3: The
VBE Options Menu
The
Options Dialog in the VBE gives us the opportunity to modify the way the VBE
looks and behaves. From the Editor tab, make sure that all the check boxes are
checked. By default, all but one of these are checked; however, the box for
Require Variable Declaration is not. We at VBA Express believe it is a good
programming practice to enable this option. Listed below is a brief description
for each option on the Editor tab. These options are discussed further in
future lessons.
Auto Syntax Check: As code is typed, Excel will display a message
for any syntax errors, or keyword misspellings.
Require Variable Declaration: This will add “Option Explicit” to the top of
every module, and will force all variables to be declared. This ensures that
there are no misspelled variables in our code, and also gives us full access to
the Intellisense menu for each variable.
Auto List Members: As code is typed, Excel displays what it
logically calculates the next part of the code should be. Excel provides an
alphabetical list of the commands that can be used.
Auto Quick Info: Displays information on the syntax of
statements as code is typed. The current argument is highlighted in bold,
optional arguments are wrapped in brackets. The Data Type returned is also
indicated.
Auto Data Tips: Valid only in “Break” mode while debugging
code, this option displays the current value of a variable when the mouse is
hovered over it.
Drag-and-Drop Text Editing: Allows for text to be dragged and dropped with
the mouse to a new location.
Default to Full Mode View: Allows all Procedures within a module to be
displayed at once.
Procedure Separator: Places a horizontal line separating each
Procedure in the Main Code Window.
Auto Indent: Repeats the indenting of the current line when
Enter is pressed.
Tab Width: Specifies the number of spaces to use when
indenting.
The Editor Format tab allows the font,
size, and color of the various types of text to be modified. Don’t worry if
you’re not familiar with all the different types of text; they are all
discussed throughout this training course. These settings can be changed at
anytime to make your code look the way you want, based on your own preferences.
The
General tab and Docking tab provide more options; however, those options should
be left at their default settings for the purpose of our training.
To
close the Option dialog press “Ok” to save any changes, or “Cancel” to dismiss
any changes.
The Project Explorer
To navigate around the various elements in the
programming environment, there is one very useful window: the Project Explorer. By default, it is
located at the top-left of the VBE, and is shown in Figure 4.
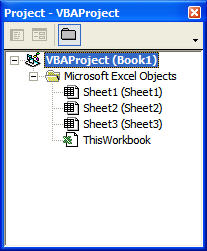
Figure 4: The
Project Explorer Window
The Project Explorer window should be visible
by default. If it is not, it can be shown by any of the following methods:
- Select
ViewàProject Explorer from the VBE Toolbar.
- Click
the
 icon on the VBE Toolbar.
 - Use
the Ctrl+R shortcut.
You should now be on more familiar ground; the
Project Explorer is just like any other Windows Explorer. It shows a hierarchy
of objects from which you can choose branches to expand and/or choose elements
to view in detail in one of the other panes. Let’s take a closer look.
VBAProject
The first item in the Project Explorer in our
graphic is called VBAProject(Book1). Book1 is simply the name of the workbook.
When the workbook is saved, the name changes to the name and file extension of
the workbook. For example, if your workbook was saved as Lesson1.xls, then in
the Project Explorer it would change to display VBAProject(Lesson1.xls). If
multiple workbooks are opened, each one would be listed in the Project
Explorer, as well as any loaded Add-ins. For now, we’ll stick to having just
one open workbook at a time.
The first item within the VBAProject is
Microsoft Excel Objects. Just like the Windows Explorer, any of the items with
a + or – can be expanded or retracted with a double-click of the mouse.
Listed within the Microsoft Excel Objects group
is every worksheet that is in the workbook. You can also see ThisWorkbook. In
later lessons we discuss the specialized code that can be placed in these
sections.
Modules
While there are several places to store code, the vast majority of the
code is stored in Standard Modules. Before we can start using a Module, we must
first add one to our project. From the VBE Toolbar select InsertàModule as shown in Figure 5. Or press the down arrow on the Insert Button ![]() and select Module.
and select Module.
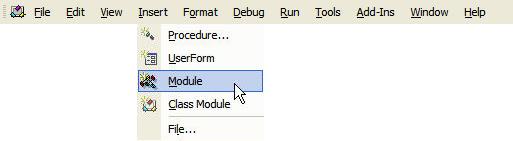
Figure 5:
Inserting A Module
You can insert as many Modules as you want; the only limitation to the
number of modules an Excel file can hold is the limitations of your computer’s
memory. Each Module can have one or many Procedures. When writing a program you
may find it easier to group certain Procedures together because they have
similar functions. Storing them in their own Module, while storing other
Procedures in a separate Module, helps to keep your project organized.
In VBA the word “Module” assumes a Standard Module, though the word
“Standard” is rarely used to describe it.
In our graphic, the project is expanded to
display the contents. Double-click to hide the contents. Click on the Toggle
Folders button to display the projects as folders, as shown in Figure 6.
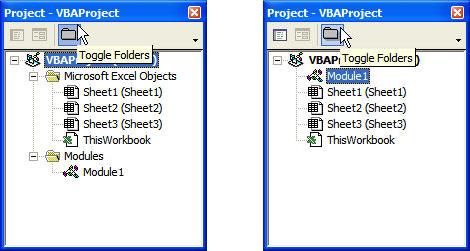
Figure 6: Toggle
Folders View
Now that we have inserted a Module, we need to
give it a useful name. While we could leave it as Module1, a more descriptive
name helps us remember the code contained therein, especially when you want to
work on a program months after it was developed.
To rename a module, first
make sure that the Properties Window is visible. By default, it is located at
the lower-left of the VBE, and is shown in Figure 7.
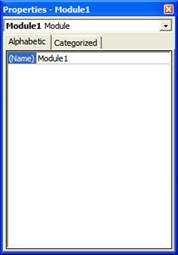
Figure
7: The Properties
Window
The Properties Window should be visible by
default. If it is not, it can be shown by any of following methods:
- Select
ViewàProperties Window from the VBE Toolbar.
- Click
the
 icon on the VBE Toolbar.
 - Use
the shortcut key, F4.
Change
the name of the module by typing into the Name field. The name must start with
a letter, cannot be more than 31 characters long, and cannot contain any
spaces. Also, you cannot use most symbols; however, you can use the underscore
(_). For this lesson let’s rename our Module to VBAX_Lesson1. Once the name in
the Properties Window is changed, the Project Explorer is updated with the new
name.
The Main Code Window
After going through the objects that can appear in the Project Explorer,
you should be itching to get your hands on some real code. Most of the
elementary items we have seen in the Project Explorer are Code Modules and they
can be edited in the main window. For the moment we’ll just see how to open a
Module within the Project Explorer.
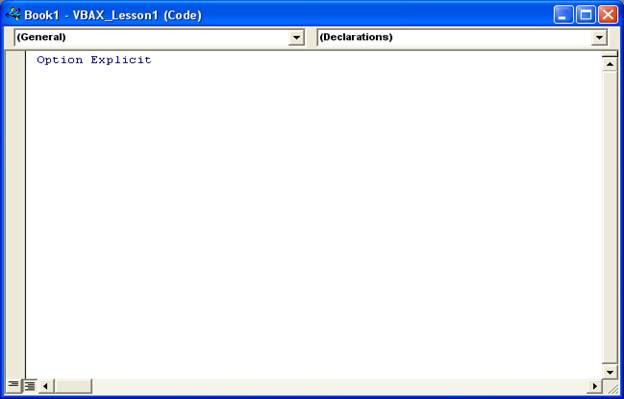
Figure 8: The
Main Code Window
To work with an existing Module, first select
it by clicking on it in the Project Explorer. It can then be opened by any of
the following methods:
- Double-click
it.
- Click
the View Code icon
 from the Project Explorer.
 - Select
ViewàCode from the VBE Toolbar.
- Use
the shortcut key, F7.
Suffice it to say that good programming
practices are to declare variables. While you don’t know what that means yet,
we’ll prepare you by setting your machine to automatically force variable
declaration by using a statement called “Option Explicit”. If you followed the
instructions in the VBE Options section, “Option Explicit” is automatically
written in as the first line of the module.
At the top of the Main Code Window, there are two dropdowns. The drop
down on the left lists various objects within the Module. The drop down on the
right lists the different procedures within the Module. Refer to Figure 9 and Figure 10.
![]()
Figure 9: The
Object List Drop Down
![]()
Figure 10: The
Event/Procedure List Drop Down
Once we start writing multiple Procedures, we
can use these dropdowns to navigate directly to the start of each Procedure.
Think of it as a table of contents for your Module.
Summary
You have now completed Lesson 1: Introduction
to the Visual Basic Editor. We discussed the VBE and went over some of the more
important terms that you need to know. You were also introduced to some of the
main windows and toolbar buttons that are used when writing code. I hope you
got as much out of reading this training as I got in writing it.
What’s Next?
So now that you know what the Visual Basic
Editor is, I bet you can’t wait to start using it. In Lesson 2 we discuss:
- Creating
a Procedure
- Variable
Data Declaration Types
- The
Macro Recorder
- Assigning
Macros to Toolbar buttons, Drawn Objects, Command Buttons, and Shortcut
Keys
- Running
Macros
Exercises
The following exercises are designed to help
gauge your understanding of this training lesson. We encourage you to complete
the following exercises without referring back through the lesson; however, you
may want to keep Excel open to assist you. Answers are provided on the last
page of this training lesson.
VBA and VBE Terms
Match the items on the left to the correct descriptions on the right.
|
Projects: Visual Basic
Editor: Procedures: Visual Basic for
Applications: Modules: |
a) The programming language used to write programs in Excel or other
applications. b) Entities that perform a task and in which the code is written.
Think of them as containers for code, if you will. c) A container for procedures. d) A container for Modules. e) The environment (or window) in which VBA is written. |